Thursday, December 18, 2008

Review of Robotics--My Experience.


This is my last entry on robots. My experience in this class has been fun with all the building prgrammingand the use of sensors. What I have learnt in this class about building robots is that there are so many ways of building one. most of the robots features depend on what climte, terrain and variables the robot might face. If the terrain is rought, you may want to have treads or treaded tyres. If you want your robot to go fast, then, you would want big wheels and maybe the NXT would be at an angle to make it more aerodynamic. If you need sensors then you have got to make your robot viable to hold them.
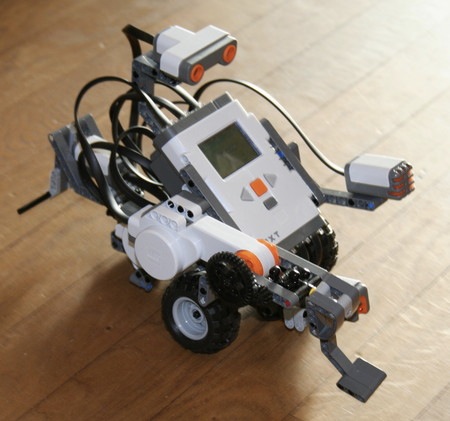
Talking about sensors, do you know how to use them? We used ultrasonic sensors, light sensors, touch sensors and sound sensors. Bats use ultrasonic sensors to find how far their prey is away from them. That is exactly what robots do, minus the prey part. they use ultrasonic sensors to create a virtual image or just to see where everything is. We used light sensors to spot and follow a line, though you can use them for so much more. that you have to explore on your own. Touch sensors can be programmed to stop when touched or released. Thats what we did. In the obstacle course, we prgrammed it to go back when touched and turn when released. Sound sensors are also simple. what we did was just programmed the robot to start and/or stop when it heard a sound.
Programming is also a important factor in the "art" of robotics. If you dont program your NXT correctly then you will not do what you want your robot to do. we only did very minor and easy programming but if you know how to use your NXT, then you can do so much with it.
I have used alot of equations to find anwers in robotics. This means that I am a little better at math. Of course I am more technologically friendly from programming but I already knew all of the science.
To reason in this class, I have used math. To communicate and collaborate, we have been in groups most of the time and worked well together by talking with each other of what we are going to do.
BYE

Tuesday, December 9, 2008

Tractor Pull


The tractor pull, of course, is a test of strength. The robot who pulls the most weight in 50 cm the fastest is the winner. What I would do is put in a small driving gear and a big driven gear. This will put the speed of the motor into the small gear and change the speed into torque. Torque, as I have mentioned before, is force. The more force, the more weight the robot can pull.

Thursday, December 4, 2008

Drag Race


This drag race, of course, is a test of speed. what we want to do is make our robot be as aerodynamic as possible. The gears we want are the biggest one possible driving the smallest one possible. We also want to make it as light a possible, but with a weight on the front so it doesn't tip.

This drag race is not as dangerous and as big as real ones (this does not apply to our grades), but this is a 3 metre race includes trying to figure out what gears we are going to use.

Monday, December 1, 2008

Gears and Speed

This is just a summary. What we found is that, the smaller the driven wheel is from the driving wheel, the faster it goes. If the driven wheel was bigger than the driving wheel, it is slower but way stronger.

Monday, November 24, 2008

Get in gear


Firstly, to understand this blog entry I will have to tell you what a driving gear and a driven gear is. A driving gear is the gear attached to the motor, the driven one is the one attached to the wheel. If the driving gear is bigger than your driven gear, then your robot will be so much faster than the motor as the gear attached to the wheel has less time to rotate that the bigger gear. If the driving gear is smaller than the driven gear, the wheels will go slower than the motor, because of the same reason as the other one.

Friday, November 21, 2008

Gears

Most of you probably know what a gear is, but if you hear gears and you don't think of machinery, a gear is a wheel with teeth on the ouside. The most important part of the gears are its teeth. Torque is a big contributor when it comes to moving gears. Torque two components, force and distance. The measurement of torque is newton-centimetre (Ncm). To increase torque increasing the force or distance. Most of may have heard of a gear, but whatever is a geartrain? A geartrain is a multistage prosess involving several gears. It either reduces or multiplies the vleocity ratio. The advantage is that it gives incredible power. Pulleys, belts and chains are also very important. Pulleys are also wheels, but they have a groove. Belts are the things that connect two pulleys together, and are like rubber bands. Chains do the exact same as belts, just not as elastic. The last thing you need to know about gears is the difference between a straight gear and a bevel gear. Straight gears let the energy go from one place to another horisontally. Bevel gears transfer the energy or motion to another axle perpendicular to another.

Wednesday, November 19, 2008

SUCCESS!


"ROB" the robot made it around the course today, making history. My teammates and I were so happy, as you can see by the picture! I am the girl by the way. The program was working perfectly and by sheer luck we missed the cans, because none of my teamates would think that the can avoidance would actually work! Well it kind of worked, it avoided the cans, but not using the ultrasonic sensor!


programming


The programming is way harder than I thought! Well the start was easy, it was just to do the simple programs i have done before. The clap start and the light stop was ok, so was the touching the wall was easy too. After the turn, on all the tests, the robot just stopped! Then I realized I needed a reset button. i found that and it worked perfectly after that.

Monday, November 10, 2008

Building Strategies


To build the robot, i was thinking of having the actuall NXT horizontal on the robot. The robot will have to be light enough so the robot does not jump like a frog. Tracks are a good application too.

The sensors have to be rearanged so they are all fully functional. This means that the touch sensor has to be at the front for it to actually touch the wall but the ultrasonic has to be at the front aswell. For the robot to actually be in the box, the light sensor has to be at the back. If we are not lucky enough to miss the cans, the cannon will have to be in the middle, but again nothing in front of it.

Wednesday, November 5, 2008

Geometry of LEGO (made in denmark)


That 1*1*1* lego brick they have always been talking about? Yeah that one. It is not acually a1*1*1 brick, it is a 6*5*5 lego brick. This is without the stud. The first actual lego brick was 2*4*1. It is actually the ratio that is important if you divide 9.6 by 8 to get 1.2(the height corresponding to 1.2 times the width.. this is because a studs width corresponds to 8mm and the hight of the brick, without the stud, to 9.6mm. that is the hard way. The ratio is easier to remember whe it is like this; 6:5. Whats the use of all this though? You dont want to make your robot too heavy with all this math anyway. To make a good robot, you have to make it strong and light weight. Impossible you say, no you can! You use studded beams, plates and pins and make a chassis. then you cross-brace it. With some of the new models os plates and pins, you could make an even ligher and stronger one. Ok here comes the math again. You must know the Pyagathorean Theorem? If you dont, then it is simple to learn. A2+B2=C2. a=base and b=height. There are only certian combos that work so I am going to show one for you to know what works and what doesn't. A=13 and B=26 13*13+26*26=c2--169+676=c2--169+676=845--square root 845=29. this works because of the whole number so c=292. You get the picture. oh and one last thing, liftarms. there are so many applications for these babys. You could connect them, make them work for a sensor or make them activate one themselves. There is so much more but I have to go now bye!

Field of view


For this experiment, we were testing on how far and wide the ultrasonic senor can 'see'.

To do this, we took a solid object and made the robot sense the white board eraser------------------------------------>

Until the robot would show question marks. Then on every 10 cm line till the end, we saw how wide the whiteboard eraser would go before the robot showed question marks again. We then put a mark on where the eraser was.

The Obstacle Course

The objective:

Your team will need to design and build a robot that uses all 4 sensors. You will then need to program your robot to maneuver through the obstacle course in the quickest time.


To make it move I will have to start with a clap. this is easy. To make it stop in the box is a little harder. I think I will have to put the light sensor on the back of the robot instead of the front. To make it wait for five seconds, I will simply just put in a wait block. The whole course program will be set up in the simple programs with reset blocks and extra trinkets that will make its run smoother. The cans are not liable to be easy though. They will be placed randomly and as I can't go out of the tape i cant make the robot turn a certian way. This means i will have to make the cans go away....